서론
개발 과정에서 API 문서화는 팀 내외부의 소통을 원활하게 하고, API의 사용성을 향상시키는 중요한 과정이다.
지난 Git-Challenge 프로젝트에서는 Swagger를 활용해 API 문서를 생성했었다.
NestJS - openapi
Swagger는 강력한 도구이지만, 서비스 코드 내에 Swagger 데코레이터를 직접 작성해야 했기 때문에 코드의 길이가 길어지는 문제에 직면했었다. 코드를 작성하고 관리하는 과정에서 이러한 방식이 실제 작업 흐름에 방해가 되는 것을 경험했다.

Spring REST Docs로의 전환
이러한 경험을 바탕으로,이번 Exam-Lab 프로젝트는 좀 더 효율적인 방법을 모색하게 되었고, 그 과정에서 Spring REST Docs를 발견했다.
Spring REST Docs의 가장 큰 매력은 테스트 코드를 기반으로 API 문서를 생성할 수 있다는 것이었다. 이는 API가 실제로 동작하는지에 대한 보증을 함께 제공하며, 따라서 프론트엔드 팀과의 신뢰성 있는 소통을 가능하게 합니다.
또한, 테스트 코드를 기반으로 문서생성을 하기 때문에, Controller와 같은 서비스 코드와 무관하게 작성될 수 있다는 점 또한 큰 매력이었다.
Spring REST Docs의 한계
그러나 Spring REST Docs는 기본적으로 Asciidoc이나 Markdown과 같은 형태로 코드 조각을 생성한다. 이는 결국 API 문서를 직접 다시 작성해야 한다는 번거로웠다.
한편, 이전에 Swagger UI를 사용했을 때의 경험에서, 그 사용성과 직관성, 그리고 Postman 없이도 API를 직접 실행해볼 수 있는 기능이 매우 유용했었다.
결합된 접근 방식: Spring REST Docs와 Swagger UI
이 두 도구의 장점을 결합할 수 있는 방법을 모색하던 중, Spring REST Docs를 통해 생성된 문서를 OpenAPI 3 스펙으로 변환하여 Swagger UI에서 사용할 수 있게 하는 라이브러리를 발견했습니다. 이 방법을 통해, 테스트 코드를 기반으로 신뢰할 수 있는 API 문서를 생성하면서도, Swagger UI의 사용성을 유지할 수 있게 되었다.
OpenAPI
OpenAPI
OpenAPI Specification
OpenAPI는 HTTP API에 대한 표준, 언어에 구애받지 않는 인터페이스를 정의합니다. 이를 통해 개발자는 소스 코드, 문서, 또는 네트워크 트래픽 검사 없이도 서비스의 기능을 발견하고 이해할 수 있습니다. OpenAPI가 적절히 정의되면, 소비자는 최소한의 구현 논리만으로 원격 서비스와 상호작용할 수 있다.
선택 기술
- Spring Boot
build tool
- gradle
Maven
스프링 구현체
- Java
Kotlin
웹 테스트 도구
Spring REST Docs 도입하기
당연하지만, 우선 Spring REST Docs를 도입해야한다.
Spring REST Docs 공식 문서에 기반해서 설정합니다.
환경설정
build.gradle은 start.spring.io에서 생성해준것을 기반으로 시작합니다.
build.gradle
plugins {
    id 'java'
    id 'org.springframework.boot' version '3.2.3'
    id 'io.spring.dependency-management' version '1.1.4'
    id 'org.asciidoctor.jvm.convert' version '3.3.2'
}


ext {
    set('snippetsDir', file("build/generated-snippets"))
}


dependencies {
    implementation 'org.springframework.boot:spring-boot-starter-web'
    testImplementation 'org.springframework.boot:spring-boot-starter-test'
    testImplementation 'org.springframework.restdocs:spring-restdocs-mockmvc'
}


tasks.named('test') {
    outputs.dir snippetsDir
    useJUnitPlatform()

}


tasks.named('asciidoctor') {
    inputs.dir snippetsDir
    dependsOn test
}
테스트 Class 생성하기
우리는 Jnunit 5를 사용할 것이니 REST Docs를 사용할 class에 아래와 같은 annotation을 적용합니다.
JUnit5ExampleTests.java
@ExtendWith(RestDocumentationExtension.class)
public class JUnit5ExampleTests {
Spring application 기능을 사용하려면 SpringExtension 도 적용해줍니다.
 @ExtendWith({RestDocumentationExtension.class, SpringExtension.class})
public class JUnit5ExampleTests {
!! 주의 !!
Junit 5.1 이상을 사용한다면 아래와 같은 방법으로도 가능하지만, 앞으로 사용할 라이브러리는 아직 이 기능을 지원하지 않으므로 따라하지 않는것을 추천드립니다.
public class JUnit5ExampleTests {

    @RegisterExtension
    final RestDocumentationExtension restDocumentation = new RestDocumentationExtension ("custom");

}
MockMvc 설정하기
보통의 테스트 코드라면, MockMvc를 @Autowired 를 사용해서 주입받겠지만, REST Docs를 사용하기 위해서는 반드시 @BeforeEach를 통해서 MockMvc를 생성해야합니다.
private MockMvc mockMvc;

@BeforeEach
void setUp(WebApplicationContext webApplicationContext, RestDocumentationContextProvider restDocumentation) {
    this.mockMvc = MockMvcBuilders.webAppContextSetup(webApplicationContext)
        .apply(documentationConfiguration(restDocumentation))
        .build();
}
Controller 만들기
대부분의 기능을 예시로 만들기 위해 생긴건 이상하지만, Controller를 하나 만들어보자
SampleController.java
@RestController
@RequestMapping("/sample")
public class SampleController {

    @PutMapping("/{id}")
    public Person sample(@PathVariable Long id, @RequestBody Person person) {
        person.setId(id);
        return person;
    }

    @Data
    private static class Person {
        private String name;
        private Integer age;
        private Long id;
    }
}
테스트 코드 작성하기
정상적인 테스트를 진행한 이후에는 .andDo(document())를 통해서 문서화 과정을 거쳐야 한다.
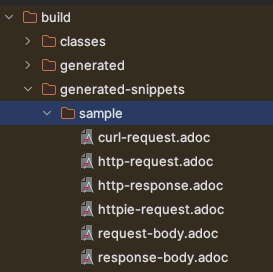
이렇게 했을때는 기본적으로 Asciidoc 형태의 파일이 빌드된곳에 생성된다
@Autowired
private ObjectMapper objectMapper;

@Test
void exampleTest() throws Exception {
    Map<String, Object> person = new HashMap<>() {{
        put("name", "luizy");
        put("age", 26);
    }};

    this.mockMvc.perform(put("/sample/{id}", 17)
                    .accept(MediaType.APPLICATION_JSON)
                    .contentType(MediaType.APPLICATION_JSON)
                    .content(objectMapper.writeValueAsString(person)))
            .andExpect(status().isOk())
            .andDo(document("sample"));
}

rest-api-spec으로 OpenAPISpecification 생성하기
restdocs-api-spec는 Spring REST Docs를 기반으로 OAS(OpenAPISpecification)를 생성하는 라이브러리이다.
이제부터는 Asciidoc는 필요없다.restdocs-api-spec 의존성을 추가하고 필요없는 의존성을 삭제하자.
환경설정
이제부터는 restdocs-api-spec README를 기반해서 설정합니다.
build.gradle
plugins {
    id 'java'
    id 'org.springframework.boot' version '3.2.3'
    id 'io.spring.dependency-management' version '1.1.4'
//    id 'org.asciidoctor.jvm.convert' version '3.3.2'

// add
    id 'com.epages.restdocs-api-spec' version '0.19.1'
}


//ext {
//    set('snippetsDir', file("build/generated-snippets"))
//}


dependencies {
    implementation 'org.springframework.boot:spring-boot-starter-web'
    testImplementation 'org.springframework.boot:spring-boot-starter-test'
    testImplementation 'org.springframework.restdocs:spring-restdocs-mockmvc'

// add
    testImplementation 'com.epages:restdocs-api-spec-mockmvc:0.19.1'
}


tasks.named('test') {
//    outputs.dir snippetsDir
    useJUnitPlatform()
}


//tasks.named('asciidoctor') {
//    inputs.dir snippetsDir
//    dependsOn test
//}

//add
openapi3 {
    server = 'http://localhost:8080'
    title = 'My API'
    description = 'My API description'
    version = '0.1.0'
    format = 'yaml'
}
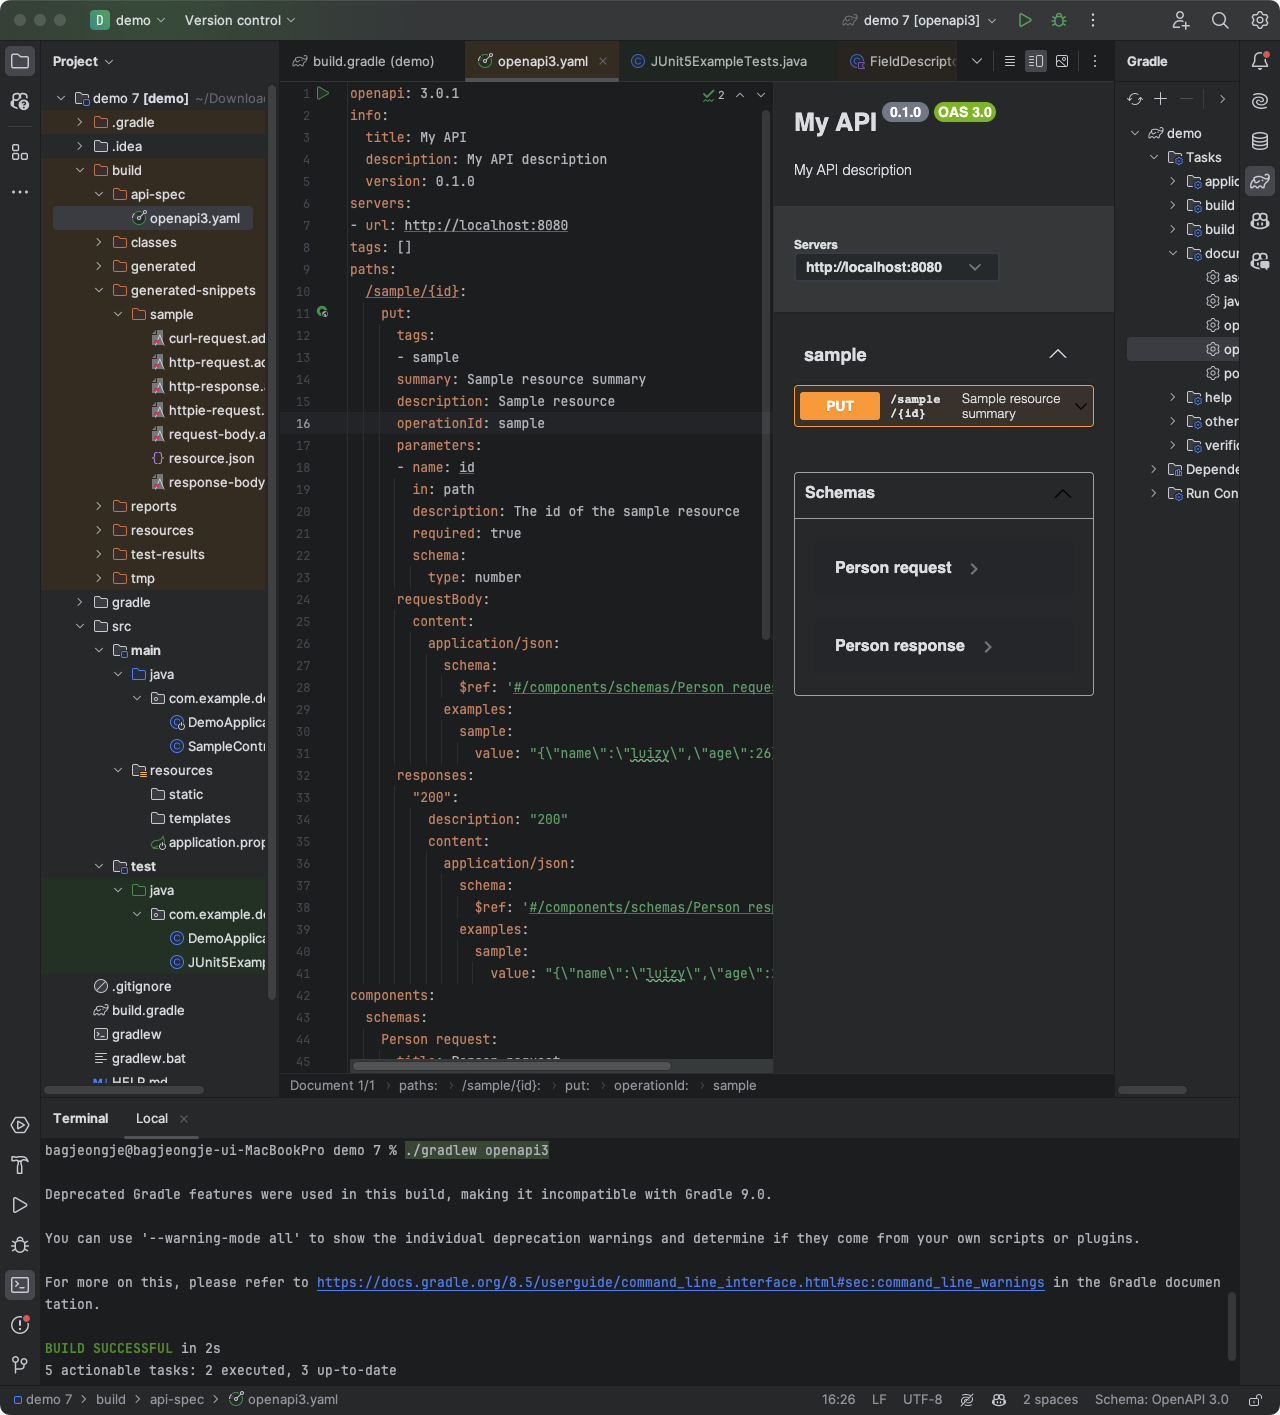
한번이라도 build를 실행해서 build 디렉터리를 생성하고 openapi3 task를 실행하면 아래와 같이 빈 openapi3.yaml 파일이 생성된다
./gradlew openapi3

이제 테스트 OAS를 생성할 테스트 코드를 작성하자
테스트 코드 작성하기
기존 테스트 코드는에서는 Spring REST Docs의 document를 사용했다org.springframework.restdocs.mockmvc.MockMvcRestDocumentation.document
이제는 restdocs-api-spec의 document를 사용하자com.epages.restdocs.apispec.MockMvcRestDocumentationWrapper.document
JUnit5ExampleTests.java
//import static org.springframework.restdocs.mockmvc.MockMvcRestDocumentation.document;
import static com.epages.restdocs.apispec.MockMvcRestDocumentationWrapper.document;
다시 한번 openapi3 task를 실행하면 방금 실행한 api를 기반으로 문서가 생성되어 있다

아직은 정보가 모호하게 담겨있다.
정확하게 OAS가 생성되도록 테스트를 생성 검증하자.
Resource 생성하기
document 함수의 다음 매개변수로 Resource를 생성할 ResourceParameter를 제공하자.
이번에도 restdocs-api-spec의 ResourceParameter를 사용하자.com.epages.restdocs.apispec.ResourceDocumentation.resource resource함수와com.epages.restdocs.apispec.ResourceSnippetParameters ResourceSnippetParameters 객체를 사용해서 구체적인 resource를 만들어보자
this.mockMvc.perform(put("/sample/{id}", 17)
                .accept(MediaType.APPLICATION_JSON)
                .contentType(MediaType.APPLICATION_JSON)
                .content(objectMapper.writeValueAsString(person)))
        .andExpect(status().isOk())
        .andDo(document("sample",
                resource(ResourceSnippetParameters.builder()
                        .description("Sample resource")
                        .tags("sample")
                        .summary("Sample resource summary")
                        // url path parameter
                        .pathParameters(
                                parameterWithName("id").description("The id of the sample resource").type(SimpleType.NUMBER)
                        )
                        // 요청 json
                        .requestFields(
                                fieldWithPath("name").description("The name of the sample resource").type(SimpleType.STRING),
                                fieldWithPath("age").description("The age of the sample resource").type(SimpleType.NUMBER).optional()
                        )
                        .requestSchema(Schema.schema("Person request"))
                        // 응답 json
                        .responseFields(
                                fieldWithPath("name").description("The name of the sample resource").type(SimpleType.STRING),
                                fieldWithPath("age").description("The age of the sample resource").type(SimpleType.NUMBER),
                                fieldWithPath("id").description("The id of the sample resource").type(SimpleType.NUMBER)
                        )
                        .responseSchema(Schema.schema("Person response"))
                        .build())));
가능한 모든 예제를 담기 위해 path parameter, response field, request field들을 다 담았다.
다시 한번 openapi3 task를 실행하고 바뀐 문서를 확인해보자

이제 생성된 OAS를 기반으로 Swagger UI를 생성해보자
Swagger UI 생성하기
Swagger UI를 띄우는 방법은 여러가지가 있다.
Swagger UI Installation 여러 방법중에 unpkg 방식을 사용할 것이다.
unpkg 인터페이스로 띄우기
정말 간단하게도, index.html 파일 하나만 추가할 것이다.
Spring boot Web mvc를 사용하면 기본적으로 resources/static 디렉터리 밑은 정적 리소스로 제공된다.
해당 디렉터리 아래 index.html 파일을 만들자
resource/static/index.html
<!DOCTYPE html>
<html lang="en">
<head>
    <meta charset="utf-8" />
    <meta name="viewport" content="width=device-width, initial-scale=1" />
    <meta            name="description"
            content="SwaggerUI"
    />
    <title>SwaggerUI</title>
    <link rel="stylesheet" href="https://unpkg.com/swagger-ui-dist@4.5.0/swagger-ui.css" />
</head>
<body>
<div id="swagger-ui"></div>
<script src="https://unpkg.com/swagger-ui-dist@4.5.0/swagger-ui-bundle.js" crossorigin></script>
<script>
    window.onload = () => {
        window.ui = SwaggerUIBundle({
        // !! 변경해야함 !!
            url: 'openapi3.yaml',
            dom_id: '#swagger-ui',
        });
    };
</script>
</body>
</html>
변경해야하는 url부분에는 OAS를 가져올 수 있도록 설정해야한다.
OAS 가져오기
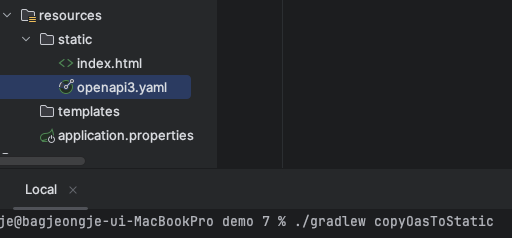
openapi3 task를 실행하면 build/api-spec/openapi3.yaml 위치에 파일이 생성된다. 이 파일을 resources/static 디렉터리 밑으로 가져와야 한다.
위 행위를 하는 새로운 task를 생성하자.
build.gradle
task copyOasToStatic(type: Copy) {
    dependsOn 'openapi3'
    doFirst {
       delete 'src/main/resources/static/openapi3.yaml'
    }
    from 'build/api-spec/openapi3.yaml'
    into 'src/main/resources/static/'
}
기존 openapi3 task를 실행하고, 생성된 OAS을 복사해오는 task이다.
앞으로는 이 task만 실행하면 된다.

서버 띄우기
어플리케이션을 실행하고 localhost:8080으로 들어가자

성공!
Swagger를 사용하기에 다양한 기능들을 사용할 수 있음을 확인할 수 있다

더 많은 설정과 값을 다루기 위해서는 OpenAPI 스펙과, restdocs-api-spec 문서를 참고하길 바란다.
실제 도입 경험 및 결과
프로젝트에 restdocs-api-spec 라이브러리를 도입한 결과, API 문서화 과정에서 겪었던 수동 작업의 양이 감소하고, Swagger UI의 직관적인 인터페이스를 통해 API를 보다 쉽게 탐색하고 테스트할 수 있게 되었다. 테스트 코드 기반으로 생성된 문서가 OAS로 변환되어 Swagger UI에서 활용되는 과정은 API 문서화의 정확성과 접근성을 모두 향상시켰다.
결론 및 권장 사항
하지만, restdocs-api-spec 이 아직은 미흡한 면들이 분명히 있다.
내가 이 코드를 작성하는 당시에도 타입과 같은 값이, OpenAPI 스펙의 모든 타입을 표현하지 못하는 아쉬움이 있었다.
사용하다가 이상한 부분들이 있다면, restdocs-api-spec issues를 확인해보는게 좋을 것 같다.
(내가 코틀린만 공부했어도... 내가 다 기여해버렸다... 기다려라...)
그럼에도, Spring REST Docs와 Swagger UI의 결합은 API 문서화 작업의 효율성과 접근성을 대폭 향상시킬 수 있는 훌륭한 접근 방식이다. restdocs-api-spec 라이브러리를 통해, 두 장점을 모두 활용할 수 있으며, OAS라는 표준 스펙을 기반으로 한 문서화는 개발자에게 더 나은 도구를 제공한다. 이러한 접근 방식은 API 문서화 작업을 단순화하고, 개발자가 보다 중요한 개발 작업에 더 많은 시간을 할애할 수 있도록 돕는다. 따라서, Spring 기반의 프로젝트에서 효율적이고 직관적인 API 문서화 방법을 찾고 있다면, Spring REST Docs와 restdocs-api-spec 라이브러리의 조합을 적극 권장한다.
